If you've played Dungeons and Dragons, then you know that the basic dice mechanic is a d20. You roll a d20, add a modifier, and compare that result to a Difficulty Class, or DC, for a skill, or the Armor Class (AC) of an enemy, to determine whether you succeed or fail.
There are three types of d20 rolls in D&D: attack rolls (attacking an enemy with a weapon, your bare hands, or certain spells), saving throws (to prevent spells and other bad effects from happening to you), and ability checks (everything else where you want to accomplish something and there's a chance of failure). Rolling a natural 1 (a 1 shows on the die) or a natural 20 (a 20 shows on the die) has a special effect only for attack rolls: natural 1 always misses, and natural 20 always hits and does extra damage. There are a few other places it matters (halfling luck allows you to reroll any natural 1), but many D&D tables houserule additional effects of a natural 1 and natural 20.
The d20 gives a nice, flat probability distribution. You're as likely to roll a 1 as a 20 as a 10. For that reason, it's exceptionally swingy. In many situations, this doesn't matter. If a lock has a DC of 13 and a rogue has +5 with his thieving tools, he has a 65% chance of succeeding. If he rolls a 1 or a 20, he usually doesn't succeed or fail more.
Where that swinginess can produce weird results is with opposed rolls. Let's say your skinny rogue is wrestling with an ogre. The rogue has a -1 on his grappling check, while the ogre gets +4. You would think that the rogue wouldn't have a chance. But because of D&D's famous swinginess, he gets a 26% chance of outwrestling the ogre. That's a lot considering there's a +5 difference.
Many games reduce the swinginess by using dice pools. For example, the Powered by the Apocalypse game engine uses a 2d6 dice pool. GURPS and AGE use a 3d6. 3d6 gives a nice bell curve with results from 3 to 18, centered on 10.5. The problem is that with a standard deviation of 2.96, 67% of the rolls will end up between 8 and 13. The chance of rolling an 18 or a 3 is only 0.5%. In short, it's too narrow a distribution. If you wanted to use 3d6, you'd have to adjust all the bonuses and DCs to make it work.
However, a much more reasonable result can be achieved with a 2d10 roll. For comparison:
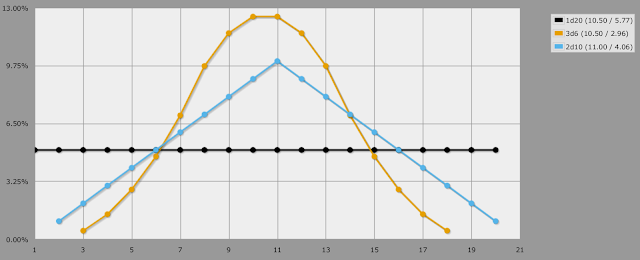 |
| Probability distribution curves for 1d20, 3d6, and 2d10. Courtesy of AnyDice. |
While the 2d10 has a sharp peak at 11 (slightly off from the 10.5 average of the d20 and the 3d6), it's not as sharp as the 3d6. This means it's more likely to roll higher or lower.
The best way to see this is not a probability distribution chart, but looking for the chance to roll at least a number, as shown below.
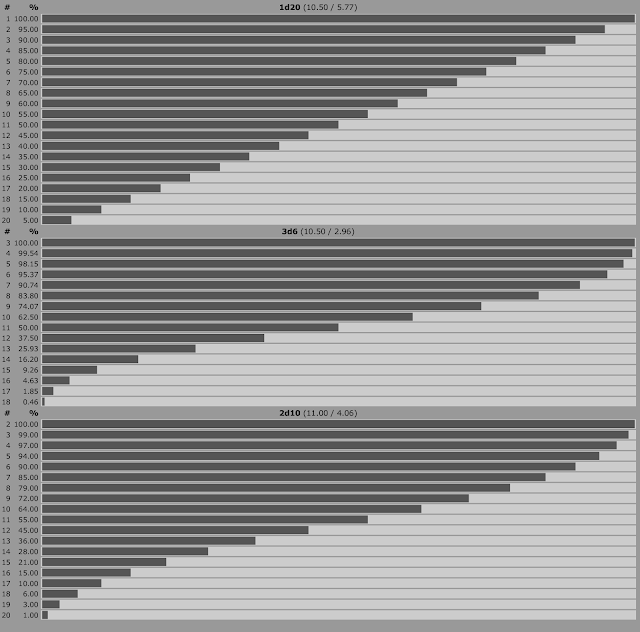 |
| Probability of rolling at least # for 1d20, 3d6, and 2d10. Courtesy of AnyDice. |
In D&D, a difficult check is one where you need at least a 15 to succeed. Players are usually cautious about attempting rolls that require a higher roll than that. With a d20, the odds of succeeding against a 15 is 30%, while with 3d6, it's less than 10%. With a 2d10, the odds are 21%, which I consider a decent compromise.
Now, let's consider the odds of rolling an 8 or higher. This is generally the to-hit number needed to hit an enemy with average AC for the players' level. Under 1d20, the odds of hitting are 65%. With 2d10, it's 79%, and with 3d6 it's 84%. Here we see that 2d10 and 3d6 are much closer to each other than to d20, but a higher average to-hit chance for players is actually an argument for this system--very little is as disappointing as missing in combat.
So let's see how we would do this conversion.
Simple Conversion
Considering all this, how do we implement a 2d10 system in D&D? Simple, any time you roll a 1d20, you substitute a 2d10 instead. If you are doing something that gives you a reroll or extra roll (advantage, disadvantage, luck), you roll 2d10 twice, and take the one (higher or lower) that fits the requirement.
But what about natural 1s and natural 20s? You can't roll a natural 1 anymore, and you roll a natural 20 only 1% of the time. It would be disappointing for critical hits to happen so seldom.
For this we introduce the idea of doubles. If you roll the same number on both d10s, and they are five or less, this is a low double. Count that as critical miss for an attack roll. If you roll the same number on both d10s and they are six or more, that is a high double, count that as a critical hit for attack rolls. Importantly, a natural 1 and natural 20 are not an automatic failure or success except for attack rolls in combat.
We can also use low doubles for abilities that let you re-roll when you roll a natural 1 (for example, halfling luck). Instead substitute low double for natural 1 in that rule. But a low double isn't a 1. If you roll two fives, that's a 10, and it's more of a gamble to reroll that than to reroll an actual 1 any place but for attack rolls, where two fives are an automatic failure.
In addition to this simple conversion, there are some optional rules you can add.
Optional rule 1: Doubles and Degrees of Success
Many DMs allow for degrees of success and failure for ability checks. If your result (roll + modifier) is 5 more than the DC, you are more successful than if you just met the DC, and if your result is below 5 less than the DC, you fail more. A table of degrees of success would look like this.
| Roll range | Degrees of Success |
|---|
| DC+10 <= result | 3 degrees of success |
| DC+5 <= result < DC+10 | 2 degrees of success |
| DC <= result < DC+5 | 1 degree of success |
| DC-5 <= result < DC | 0 degrees of success |
| DC-10 <= result < DC-5 | 1 degree of failure |
| result < DC-10 | 2 degrees of failure |
What degrees of success or failure means depends on the DM and the context of the roll. Here are some possibilities:
- For any sort of knowledge or information check (Arcana, Nature, Survival, Perception, History, Religion, Investigation), the higher your degree of success, the more information you obtain. However, more degrees of failure might actually make it harder for others, as you trample over important clues or confuse your party members with your misinformation.
- With three degrees of success, you don't just climb a wall, you clamber up it at full speed and give anyone following advantage on their climbs.
- With two degrees of success, you climb up at half speed as usual, but those who follow you have advantage on their climb checks.
- One degree of success is just success.
- Zero degrees of success is a failure, but it's a near miss. The DM can allow you to try again without penalty, or even allow you to succeed for a price: it takes longer, or you alert a guard, or you gain a level of exhaustion, or you convince the guard to let you through but you need to bribe him.
- With one degree of failure, you not just fail, you lose ground, so if you can try again at all, it's going to be harder. You fell if you were trying to climb a wall, or you insulted the person you were trying to persuade.
- With two degrees of failure, the task just became impossible, and you're going to have to try another way. You jammed the lock and can't pick it now, or the pipe you were trying to climb collapsed.
Importantly, not all ability checks need to have degrees of success or failure. Some can be a simple pass/fail, no extra benefits or consequences for more or less degrees of success. But degrees of success or failure give us options, many of which DMs already use a lot of the time.
With a 2d10 system, degrees of success become more significant, as you're less likely to roll really low or really high, so more degrees is more extraordinary. Importantly, with degrees of success, we can apply high and low doubles to ability checks without turning a double into an automatic success or failure. With this option, a high double increases the degree of success by one, while a low double decreases the degree of success by one. This is equivalent to adding five for a high double and subtracting five for a low double.
We can even circle back to attack rolls, and apply degrees of success to them. In this case, a result 5 higher or lower than the AC does not grant an extra degree of success or failure, but rolling a high or low double does. A critical hit requires two degrees of success--you need to roll a high double, but you also need your roll plus modifier to be above or equal to the AC. A high double plus modifier that's below the AC hits, but doesn't critical. Likewise, a low double can turn a hit into a miss. As an option, you can also use 1 degree of failure (a low double plus modifier that is also below the AC) as a fumble. Note that there are generally no fumble rules in fifth edition D&D, so use that with caution. (If I used it, I'd grant an opportunity attack to enemies when a character fumbles.)
Finally, we can apply this to saves as well. A high double automatically saves, a low double automatically fails. If we really want to, we can turn a low double that is also below the DC into a critical failure (take double damage from the spell or effect) and a high double that is also above the DC into a critical success (take no damage if you would have taken half), but again, use with caution. The rogue's or monk's Evasion ability with this particular variant is equivalent to one extra degree of success for Dexterity saves.
When we allow high double and low double to both be meaningful, keeping the higher roll or the lower roll with advantage or disadvantage can become confused. For the sake of simplicity, the higher degree of success is the roll to keep with advantage, or discard with disadvantage. In most cases, a high double beats a higher roll beats a lower roll beats a low double. But there are exceptions: a double 5 is better than a 1 and a 2 for ability checks, but not for attack rolls and saves, where a double 5 automatically fails but a 3 plus a high modifier might succeed.
Optional rule 2: Extra Dice
In the simple conversion, we attempted to keep advantage and disadvantage the same--just roll 2d10 again. Let's revisit that. What if, instead of rolling 2d10 twice, we rolled 3d10 and picked the two dice we wanted for advantage, or discarded the highest die roll for disadvantage?
 |
| Probability of rolling at least a value for advantage and disadvantage variants, ignoring doubles. Courtesy of AnyDice. |
You'll notice right away that for the probability to roll at least a value, the difference between 3d10 pick the highest or lowest differs very little from the best of two 2d10 rolls. The difference between those advantage calculations and the regular d20 advantage is also pretty small. There is a marked difference between disadvantage with 2d10 and disadvantage with d20, though, for complex mathematical reasons that I won't go into because I haven't figured them out yet.
What's the reason we might want to use an extra d10 instead of more 2d10 rolls? For one, it makes advantage and disadvantage easier--always choose the high double, never choose the low double with advantage. For example, if you rolled two 5s and a 1, a 1 and a 5 is always better than a low double 5, no matter the type of roll (6 > 10-5). For disadvantage, it's the inverse, though I find it simpler to discard the highest and not worry about doubles--players are less likely to feel cheated if that happens to remove a low double or result in a high double.
It also makes double and triple advantage or disadvantage easier to adjudicate--just add more d10s. For the most part, double and triple advantage don't exist in Fifth edition, but there are exceptions, such as the Elven Accuracy feat and the Lucky feat. For Elven Accuracy, roll 4d10 (advantage + 1d10) and choose two d10s. For every luck point spent on a roll, you can add another d10, but you always choose two d10s.
But what if you have disadvantage and use a luck point? Lucky doesn't have to cancel disadvantage in this case. Instead you roll 3d10 for disadvantage, then 1d10 for the luck point, remove the highest d10, and pick two of the remaining d10s. This way lucky no longer converts disadvantage into super advantage, but it can still help to mitigate it.
Finally, if more than one person can reasonably use the Help action to help another in a roll, then you can add a d10 for each person helping.
However, for features like halfling luck or a Divination Wizard's Portent, where you replace a roll rather than take the highest or lowest roll, you roll a fresh 2d10 instead of adding a d10. (RAW, you don't keep any advantage or disadvantage that the roll would have.)
Optional rule 3: Inspiration
Finally, what about Inspiration? Here, I favor borrowing from the most recent
One D&D playtest (these are playtest rules for the next version of D&D). In this version, you can spend Inspiration to grant yourself advantage after rolling. If you rolled with disadvantage initially, you don't just cancel the disadvantage--you convert it to advantage. This works whether you roll 2d10 twice (pick the best rather than the worst) or 3d10 (don't discard the highest before picking two dice). Otherwise, you roll an extra d10 or roll 2d10 again. But you can't use inspiration if you already have advantage.
The thing I would change is that instead of gaining inspiration when you roll a 1, you gain inspiration after the final result of your roll is a double--either high or low. (I say "after the final result" to make it clear that you can't use the inspiration you gain on the same roll that grants it to you.) It represents both determination to do better after stumbling, and riding the high of success. (This also means that a feature like halfling luck doesn't make it almost impossible to gain inspiration from die rolls.)
Summary
If you apply all these optional rules, the end result would look something like this:
- High double: Both d10s have the same value of 6 or higher.
- Low double: Both d10s have the same value of 5 or lower.
- Ability Check: roll 2d10 + modifier (high double adds 5, low double subtracts 5)
- Ability Check Degrees of Success/Failure: For every 5 above or below the DC, you get an additional degree of success or failure, respectively. What this means depends on context.
- Saving Throw: roll 2d10 + modifier (high double always succeeds, low double always fails)
- Attack roll: roll 2d10 + modifier (high double always hits, crits if would hit anyway, low double always misses)
- Advantage: roll 3d10, pick two (it's always advantageous to pick high doubles and avoid low doubles, otherwise pick the highest two d10s)
- Disadvantage: roll 3d10, drop the highest.
- Inspiration: Gained when roll any double final result. Can be spent after roll to turn into advantage (even if initially rolled with disadvantage), roll an extra d10 if necessary
- Luck point: Roll an extra d10, pick two d10s. (If initially rolled with disadvantage, still remove the highest roll before picking two.)
My group has decided to playtest these rules. We're playing the Icewind Dale: Rime of the Frostmaiden module, so I'm interested in seeing what effect this has when no changes are made to the module to adjust for this.


